Folosim cookie-uri pentru a vă oferi o experiență mai personalizată și de calitate mai bună. Vizitând acest site web, sunteți de acord cu utilizarea de cookie-uri de către site-ul nostru. Dacă preferați să nu acceptați cookie-uri sau aveți nevoie de mai multe informații, vă rugăm să vizitați Politica noastră de confidențialitate.
Dacă ştii cu exactitate în ce categorie se încadrează întrebările tale poţi alege una dintre categoriile de mai jos pentru întrebările puse frecvent. Catalog:
Rezultate:
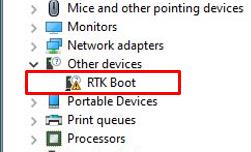
Întrebare (Q&A-152|488):
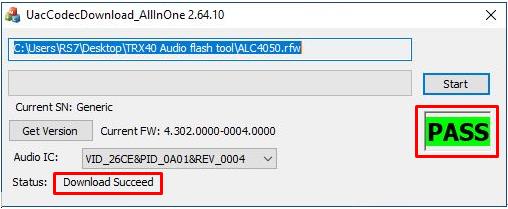
Am o placă de bază TRX40. În Device Manager este un device RTK de boot cu un semn de exclamație și nu se aude sunet la ieșirea prin portul audio. Ce pot face pentru a remedia această problemă?(2020/4/1)
Răspuns:Dacă există un device RTK care apare în Device Manager și portul audio nu poate fi folosit, vă rugăm să urmați pașii de mai jos pentru a înlătura device-ul RTK și permite sunetului să funcționeze corect.
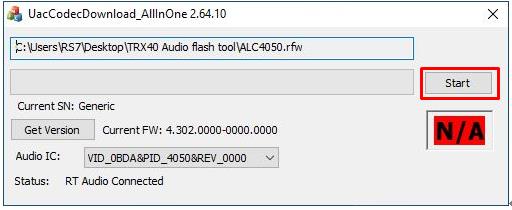
Pasul 5. Faceți dublu clic pe UacCodecDownload_AllInOne_RsProxy_2.64.10
Pasul 6. Apăsați butonul Start pentru a începe actualizarea firmware-ului audio.
Pasul 7. După ce procesul de actualizare s-a încheiat, utilitarul va afișa Pass ceea ce înseamnă că firmware-ul audio a fost actulizat cu success și nu ar mai trebui să apară nici un device RTK de boot în Device Manager.
Întrebare (Q&A-151|487):
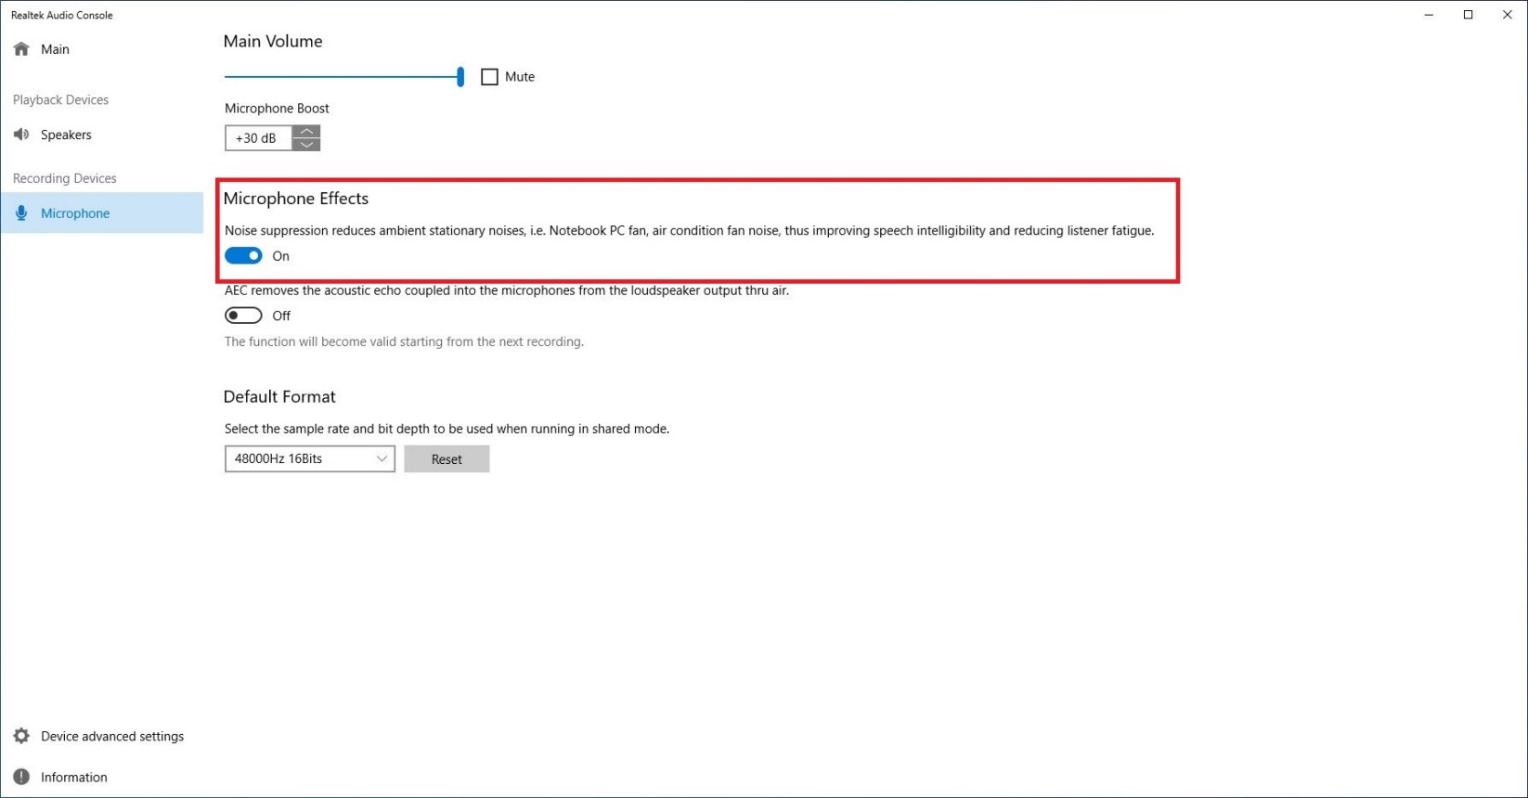
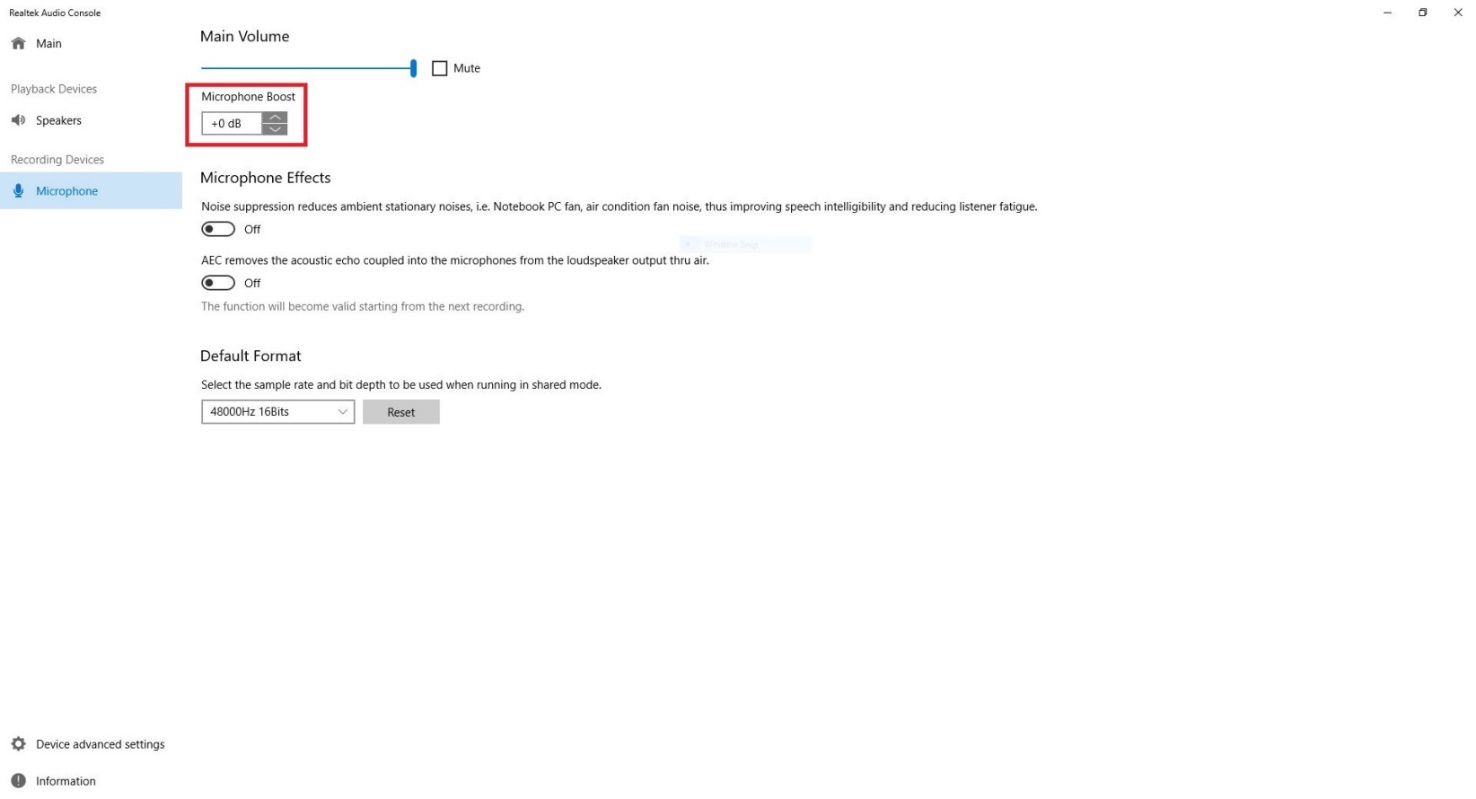
Când înregistrez cu microfonul in Windows 10 1909, se aud zgomote de fond la redarea înregistrării. (2020/1/1)
Răspuns:Dacă se aud zgomote din înregistrări, vă rugăm să alegeți una dintre metodele de mai jos pentru a evita înregistrarea cu zgomote.
Metoda 1:
Pasul 1.
Descărcați driverul audio de înaltă definiție Realtek de pe site-ul ASRock.
*Vă rugăm să verificați că aveți cablul LAN conectat când instalați driverul audio Realtek.
Pasul 4.
Odată ce setarea de mai sus este active, calitatea înregistrării va fi îmbunătățită.
Metoda 2:
Pasul 1.
Faceți referire la Pasul 1 și Pasul 2 ale metodei 1 pentru a deschide "Realtek audio console”.
Pasul 2.
Ajustați Microphone Boost la +0db.
Pasul 3.
Odată ce valoarea este ajutată la +0db, calitatea înregistrării va fi îmbunătățită.
Întrebare (Q&A-142|468):
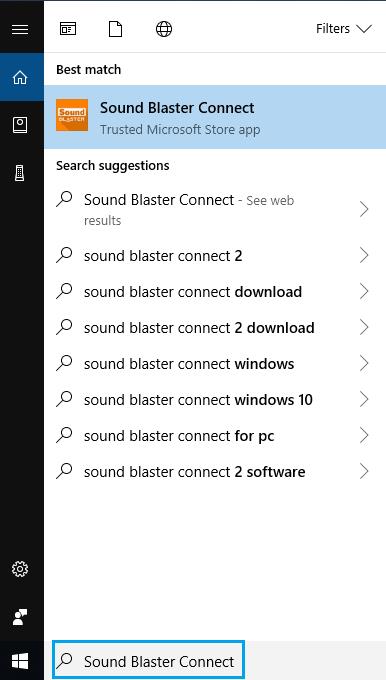
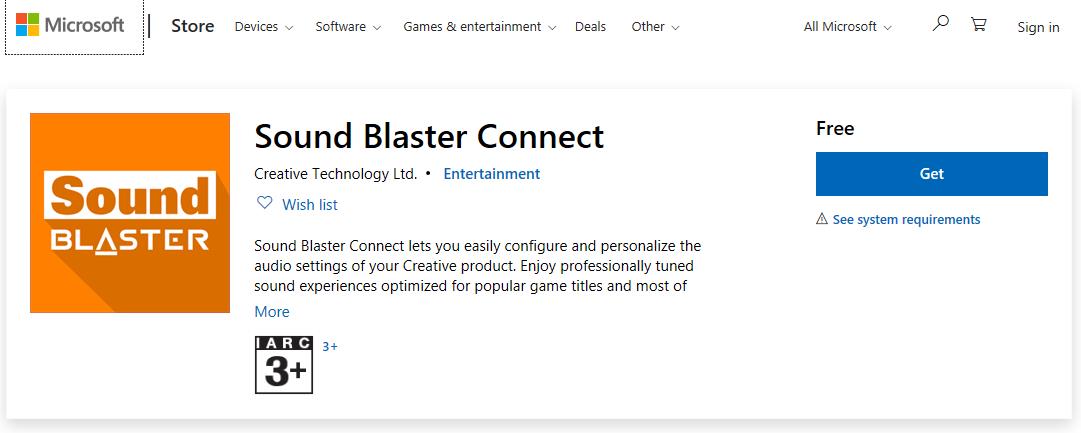
Cum instalez aplicatia Sound Blaster Connect APP in Windows 10 RS4 sau o versiune ulterioara?(2018/10/1)
Răspuns:In general, sistemul va descarca automat APP-ul in fundal dupa instalarea driverului Realtek Audio. Va rugam introduceti "Sound Blaster Connect” in bara de cautare Win10 pentru a accesa APP.
Daca APP nu apare pe sistemul dvs. urmati pasii de mai jos pentru a instala manual.
1. Asigurati-va ca placa de baza accepta Creative Sound si cu driverul Realtek Audio instalat.
* Va rugam sa vizitati pagina cu specificatiile placii de baza de pe www.ASRock.com pentru detalii.
* Driverul Realtek Audio poate fi instalat/descarcat de pe CD-ul de suport si de pe site-ul oficial ASRock.
2. Accesati "Sound Blaster Connect" din Microsoft Store si faceti clic pe "Get" pentru a incepe descarcarea. https://www.microsoft.com/en-sg/store/p/sound-blaster-connect/9n66rljrt8z2
3. Dupa instalare, faceti clic pe Launch pentru a lansa APP.
Consultati urmatorul tabel care accepta Creative SoundBlaster Cinema5.
Întrebare (Q&A-142|469):
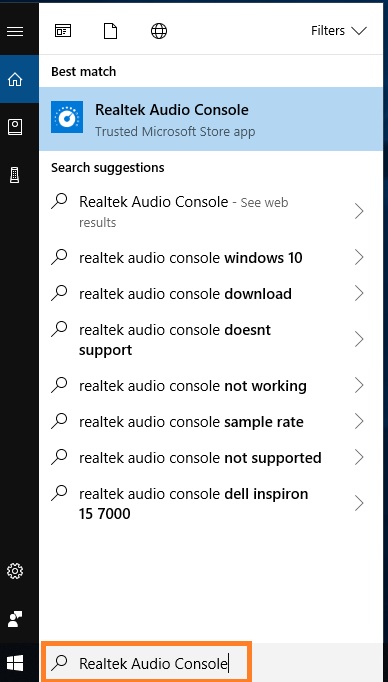
Cum se instaleaza Realtek Audio Console APP in Windows 10 RS4 sau o versiune ulterioara?(2018/10/1)
Răspuns:In general, sistemul va descarca automat APP in fundal dupa instalarea driverului Realtek Audio.
Va rugam introduceti "Realtek Audio Console" in bara de cautare Win10 pentru a accesa APP.
* Va rugam sa conectati cablul LAN la instalarea driverului Realtek Audio.
Daca APP nu apare pe sistemul dvs. urmati pasii de mai jos pentru a instala manual.
1. Accesati device manager pentru a verifica daca driverul Reaktek Audio este instalat.
* Driverul Realtek Audio poate fi instalat/descarcat de pe CD-ul de suport si de pe site-ul oficial ASRock: www.ASRock.com.
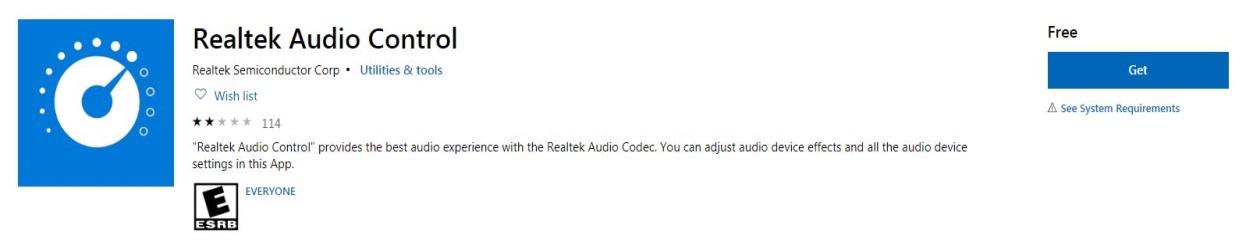
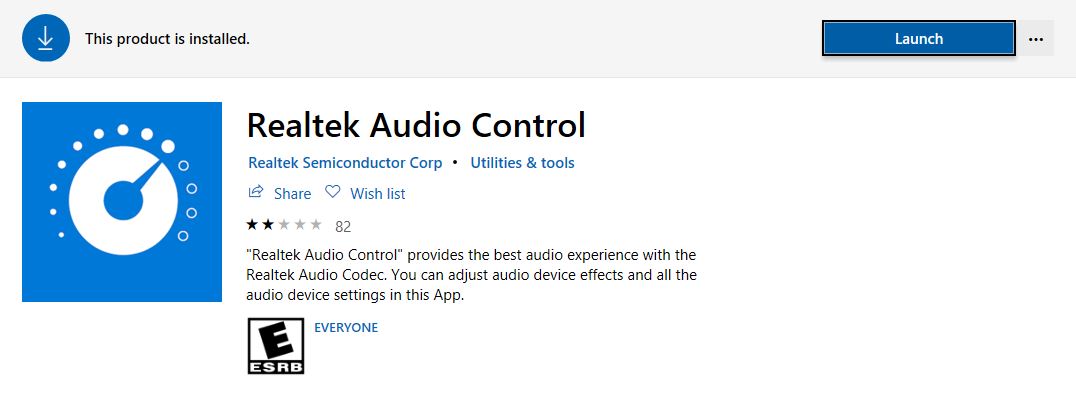
2. Consultati urmatorul link pentru a accesa "Realtek Audio Control” din Microsoft Store si faceti clic pe "Get" pentru a incepe descarcarea. https://www.microsoft.com/store/productId/9P2B8MCSVPLN
3. Dupa instalare, faceti clic pe Launch pentru a lansa APP.
Întrebare (Q&A-137|457):
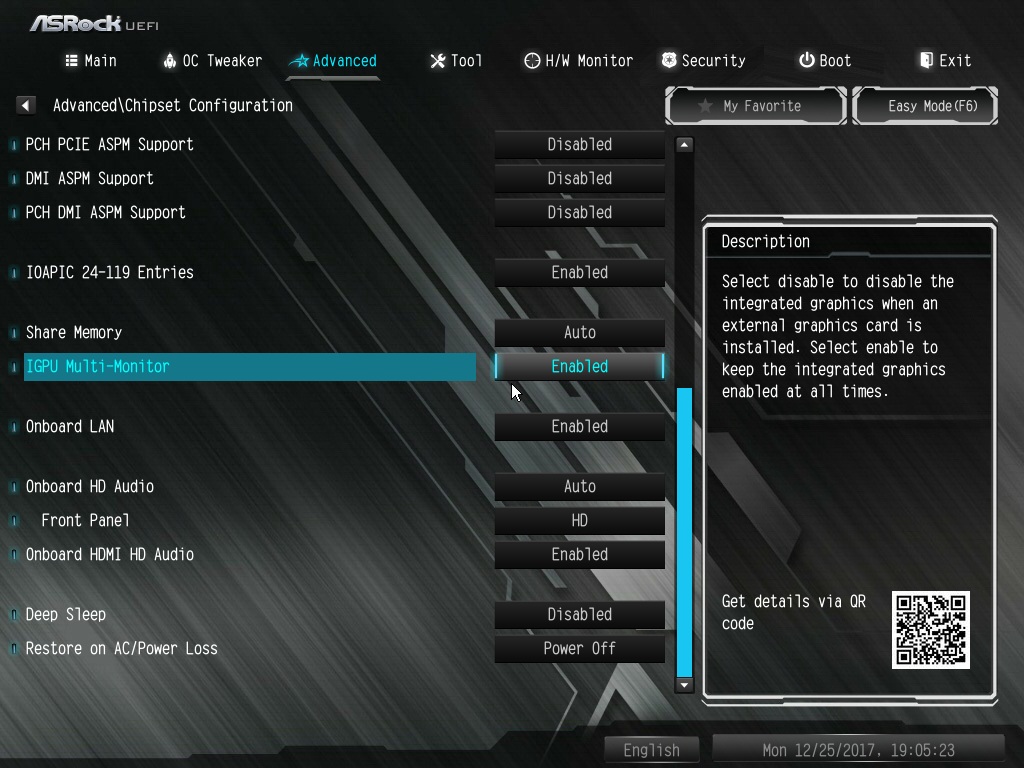
Doresc sa folosesc casca Windows Reality Mixed pe port-ul HDMI de pe placa, ce ar trebui sa fac?(2017/12/1)
2. Daca este instalata o placa grafica externa, activati "IGPU Multi-Monitor" in BIOS.
BIOS Path: Advanced > Chipset Configuration > IGPU Multi-Monitor
3. Descarcati versiunea 15.60.01.4877 a driverului VGA din Intel download center si instalati-l pe sistemul dvs.
Link de descarcare: https://downloadcenter.intel.com/product/128199/Graphics-for-8th-Generation-Intel-Processors
4. Instalati conectorul USB 3.0 pentru "Windows Mixed Reality" la portul USB3.0 de la bord
5. Instalati conectorul HDMI al castii "Windows Mixed Reality" in portul HDMI de pe placa
Casca Windows Mixed Reality ar trebui sa functioneze acum.
Întrebare (Q&A-135|455):
Cum pot reda Dolby ATMOS prin intermediul unui receptor pe Z270 Gaming-ITX/ac?(2017/10/1)
Răspuns:Consultati urmatoarele cerinte, configuratii si proceduri de configurare.
[Cerinte]
OS: Windows 10
Receptor/decodor: Onkyo TX-NR 747 sau alt receptor care accepta HDCP 2.2
Player: unitate Pioneer Ultra HD Blu-ray
BD Disk: M ajoritatea discurilor 3D / 4K BD
Software-ul de redare: Power DVD 14 au versiuni ulterioare
[Configurare]
M/B: Z270 Gaming-ITX/ac
BIOS: P2.30
[Setup]
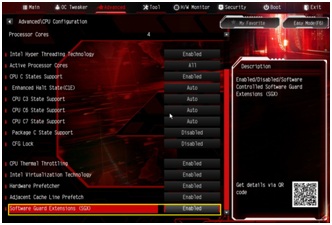
1. Cand sistemul booteaza apasati "F2" pentru a intra in ecranul de configurare UEFI.
Accesati Advanced > CPU Configuration si activati "Software Guard Extensions" in setarea BIOS.
Apasati "F10" pentru a salva si a iesi din ecranul de configurare BIOS.
2. Butati sistemul de operare si instalati toate driverele pentru placa de baza.
Instalati driverul ME veriunea: 11.6.0.1126 ( suporta Ultra HD Blu-ray). Descarcati driverul de la urmatorul link: http://www.asrock.com/MB/Intel/Fatal1ty%20Z270%20Gaming-ITXac/index.asp#osW1064
3. Mergeti la Control Panel > Hardware and sound > Sound si selectati "Receiver output”.
Întrebare (Q&A-119|396):
Merge DTS Connect 5.1 Surround sub Windows 10?(2015/8/1)
Răspuns:Datorită limitărilor sistemului de operare Microsoft Windows 10, DTS Connect 5.1 Surround nu merge pe Windows 10.
Dacă vrei să foloseşti sunt DTS connect 5.1 Surround, te rugăm să alegi o versiune mai veche de windows(Windows 8.1/ Windows 8/ Windows 7).
Întrebare (Q&A-106|350):
Atunci când ascult muzică sau ma uit la filme folosind Media Player pe Win8 32/64bit, Media Player se opreşte neaşteptat şi afişează un mesaj de eroare, de fiecare data când conectez caştile la panoul audio frontal. Ce pot face? (2013/9/1)
Răspuns:Pentru a beneficia de opţiunile audio oferite de panoul frontal, dupa conectarea căştilor vă rugăm să reporniţi Media Player şi să rulaţi din nou fişierul.
Întrebare (Q&A-89|297):
Cum se configureaza iesirea de sunet digital (DTS5.1, Dolby5.1, DTSHD Master and Dolby True HD) via HDMI sau SPDIF?(2011/11/1)
Răspuns:Cerinte:
OS: Windows7, Vista SP2 sau versiuni mai noi.
Receptor / decodor: Onkyo TX-SR608 amplificator spre exemplu:
Redare software: spre exemplu Power DVD10 v10.0.2025.52 sau alt software de redare.
Configurare:
1. Instalati toate driverele din suportul CD, dupa aceea verificati manager dispozitiv, ar trebui sa nu apara "!" sau "?" pe lista.
2. Intrati in Control Panel>Hardware si Sunet> Sunet
Daca doriti sa faceti output HDMI, selectati [HDMI output]
Daca doriti sa faceti output via SPDI, seIectati [Digital output]
*Chipset/Placa de baza diferite pot afisa informatii diferite, imaginea de mai sus este numai pentru referinte.
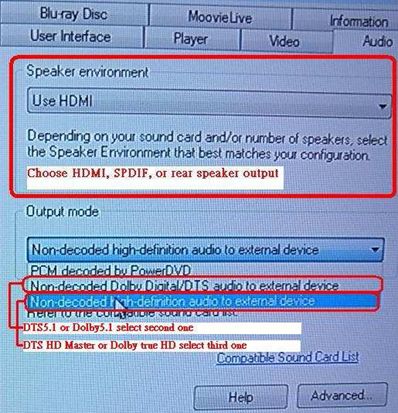
3. Accesati setarile Audio din aplicatie.
Luam spre exemplu Power DVD 10 de aici: Selectati mediul Speaker si modurile Output care le doriti.
4. Setati amplificatorul/decodorul pe iesirea de sunet digital, cea pe care o doriti.
5. Setati formatul de iesire corespunzator de pe continutul dumneavoastra/ manualul sursa.
6. Dupa aceea se poate reda continutul/sursa.
Întrebare (Q&A-78|263):
If I use AC'97 front audio panel with VIA® audio codec motherboard, how do I connect AC'97 front panel to HD Audio header on the motherboard?(2010/2/10)
Răspuns:If you use AC'97 front audio panel, please install it to the HD audio header as below:
A. Connect Mic_IN (MIC) to MIC2_L.
B. Connect Audio_R (RIN) to OUT2_R and Audio_L (LIN) to OUT2_L.
C. Connect Ground (GND) to Ground (GND).
D. MIC_RET and OUT_RET are for HD audio panel only. You don't need to connect them for AC'97 audio panel.
E. Enter BIOS Setup Utility. Enter Advanced Settings, and then select
Chipset Configuration. Set the Front Panel Control option from [Auto] to [Enabled]. For Windows® XP
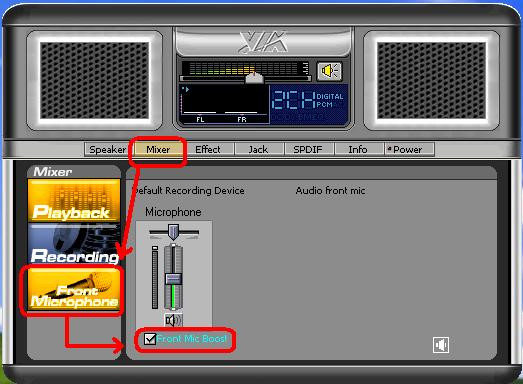
F. Enter Windows® system. Click the icon on the lower right hand taskbar to enter VIA® ADeck. Click "Mixer", select "Front Microphones", choose "Front Mic Boost", and leave.
Like below picture:
H. If you want to hear your voice through Front Mic, Please click "Mixer", select "Play Back", choose "Front Mic", and leave.
Like below picture: For Windows® Vista™ / Windows® 7
F. Enter BIOS "Chipset Settings" page, manual [Front Panel] to [Enable].
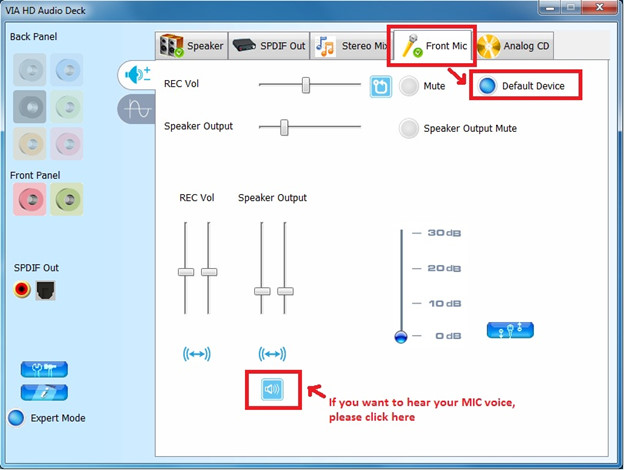
G. Enter Windows® system. Click the icon on the lower right hand taskbar to enter VIA® VDeck. Click "Front Mic", select "Default Device"
H. If you want to hear your voice through Front Mic, Please click "Speaker Output" icon.
Like below picture:
Întrebare (Q&A-70|245):
I install ATI 2xxx, 3xxx, 4xxx series PCIE VGA card on the motherboard. After installing all Windows® XP drivers from the motherboard, it still shows an unknown "audio device on the high definition audio bus." message under device manager. What could I try?(2009/1/12)
Răspuns:There is an integrated audio chip in the ATI 2xxx, 3xxx, 4xxxx series graphics cards.
Please install ATI HDMI audio driver.
http://ati.amd.com/support/drivers/xp/hdmiaudio-xp.html
Întrebare (Q&A-69|241):
I have a motherboard with Realtek HD Audio Codec. When I use Windows® XP SP3 or upgrade to Windows® XP SP3, the onboard audio doesn't work. What could I try?(2008/11/27)
Răspuns:Please try the Realtek latest audio driver.
The driver is available from this link: http://www.realtek.com.tw/downloads/downloadsView.aspx?Langid=1&PNid=14&PFid=24&Level=4&Conn=3&DownTypeID=3&GetDown=false
Întrebare (Q&A-66|232):
I install more than 2GB system memory on my system. When I run the "Sound Recorder" under Windows® XP, it always shows the following error message. What's wrong? (2008/7/31)
Răspuns:This is the limitation of Windows® XP. Please refer to the Microsoft® Knowledge Base for details: http://support.microsoft.com/kb/284893
Întrebare (Q&A-65|230):
When I install Realtek HD Audio driver, I found the system shows below error message. What can I do? (2008/6/26)
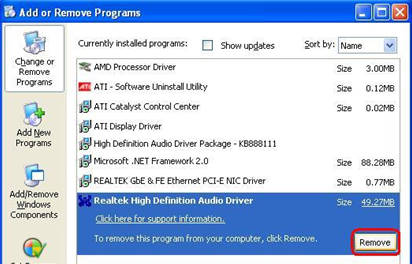
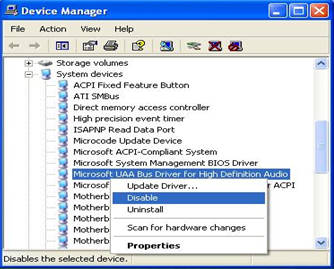
Răspuns:Please refer to below steps to reinstall Realtek HD Audio driver:
1.Enter into "Add or Remove Programs" and remove "Realtek High Definition Audio Driver"
2.Disable all "Microsoft® UAA Bus Driver for High Definition Audio" in Device Manager first
3.Then uninstall all "Microsoft® UAA Bus Driver for High Definition Audio" from the system.
4.Reboot system
5.Reinstall "Realtek HD Audio driver" from Motherboard Support CD.
If you still meet this problem, please reinstall fresh Windows® system.
Întrebare (Q&A-63|226):
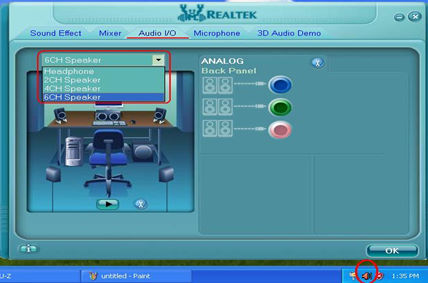
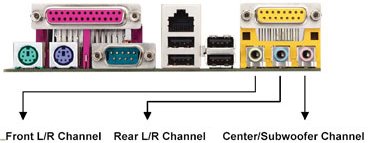
My motherboard with Realtek ALC662 audio codec supports 5.1 channel HD Audio. But it has 3 audio connectors (Light blue, Lime and Pink) on the rear audio panel. How do I connect my 5.1 channel speakers to the rear audio panel?(2008/3/24)
Răspuns:Please refer to following steps to connect your 5.1 channel speakers:
1. Connect the "Rear Speaker" to Line In (Light blue) port
2. Connect the "Front Speaker" to Line Out (Lime) port
3. Connect the "Central / Subwoofer" to Microphone (Pink) port
4. Adjust the "Audio I/O" setting to "6CH Speaker" in REALTEK Audio Management. Please refer to the following picture:
Întrebare (Q&A-57|207):
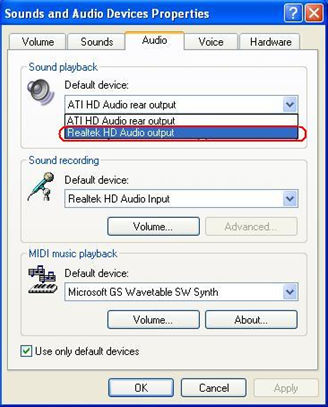
After installing ATI HDMI audio driver for my ATI HD 2xxx series PCIE card, I found the onboard sound will not work. How do I fix the problem?(2007/9/10)
Răspuns:Please kindly refer to below steps to check your system setting.
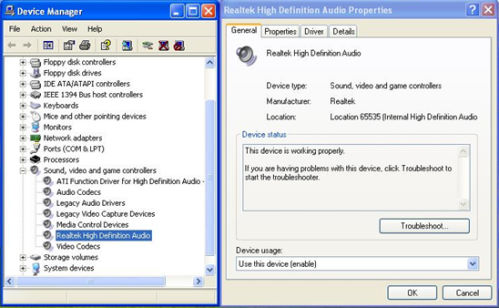
1.Please double check the onboard sound is working properly in Device Manager.
(If not, please reinstall Realtek HD Audio driver from Support CD.)
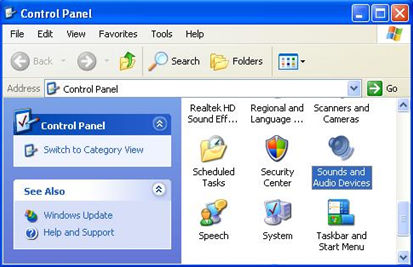
2.Enter the Sound setting in the Control Panel.
3.If the Default device of the Sound playback is "ATI HD Audio rear output", please change it to "Realtek HD Audio output".
4.Press "OK" to save setting.
Întrebare (Q&A-54|200):
I have a motherboard with Realtek HD audio codec. After resume Windows® Vista™ from sleep or from hibernation, the high definition audio device may no longer work. How do I solve this?(2007/4/25)
Răspuns:This is caused by Microsoft. It can be solved by installing the Microsoft® Hot fix. Please refer to the Microsoft® Knowledge Base: http://support.microsoft.com/kb/929685/en-us
Întrebare (Q&A-53|198):
I have a motherboard with Realtek HD audio codec. After installing the Microsoft® Security Update 925902 and 928843, my system shows the following error message. How do I fix this? (2007/4/20)
Răspuns:This is caused by Microsoft. It can be solved by installing the Microsoft® Hot fix. Please refer to the Microsoft® Knowledge Base: http://support.microsoft.com/kb/935448/
Întrebare (Q&A-52|196):
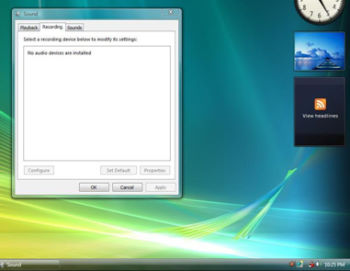
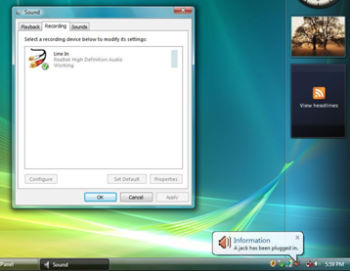
My onboard audio is Realtek HD audio. In the Windows® Vista™, I can't use Sound Recorder to record the audio. What should I do?(2007/3/19)
Răspuns:Please refer to below steps to set the audio device.
1.Install Realtek HD Audio driver from motherboard Support CD. Or download the Realtek HD audio driver from ASRock website.
https://www.asrock.com/support/Download.asp
2.Plug in your recording devices (Microphone or other devices) to the Line-in port (or Microphone port), and then the recording device will show up "Line In" (or "Microphone") icon. Please kindly refer to below image. (Control Panel > Sound > Recording)
*Before plug in the recording devices:
*After plug in the recording devices:
3.Reopen the Sound Recorder to record the audio.
Întrebare (Q&A-50|193):
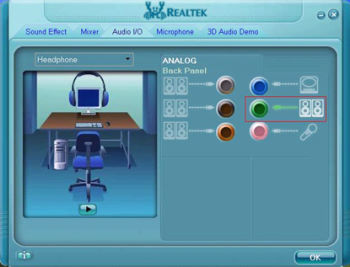
I plugged a headphone in my ASRock motherboard with Realtek HD Audio, and set the "Audio I/O" from "2CH" to "Headphone" in Realtek Audio Manager (picture1).
But the Realtek Audio Manager always recognized my headphone as 2CH speaker after I restarted the operating system (picture2).
What should I do?(2007/1/16)
Răspuns:Please refer to the following steps to set up the Realtek Audio Manager correctly.
1.Please remove all audio I/O (Headphones, Speakers, Microphone...) from the motherboard.
2.Please go to Realtek Audio Manager and set the "Audio I/O" you want.
3.Click ok.
4.Please plug your audio I/O back.
5.Restart your system.
Întrebare (Q&A-50|192):
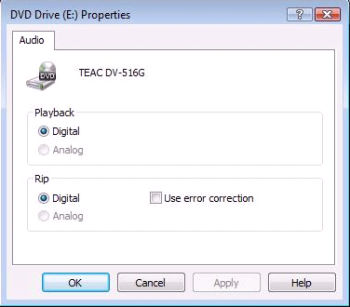
I would like to use the analog CD-in function in Windows® Vista™. But the "Analog" item of Playback and Rip can not be selected in Windows® Vista™. It was gray. Why? (Here is the screenshot.) (2007/1/16)
Răspuns:Windows® Vista™ operating system does not support the analog CD-in. The output of CD/DVD-ROM playback will be digital only.
Întrebare (Q&A-42|172):
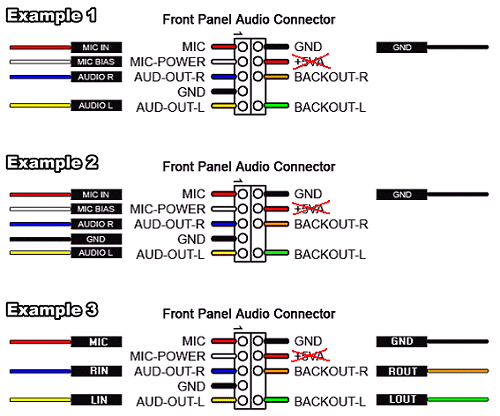
My onboard audio is AC'97 audio. The front panel audio connector cables of my case are different from the description of manual. How should I connect them? Please advice.(2006/4/21)
Răspuns:The wording on the front panel connector cables may be different by each chassis manufacturer. Please check the function of each cable. Otherwise it may damage the board if cables are connected to the wrong connectors. We found that if you connect the "GND" (Ground) or "USB VCC" (USB Power) connector pins to the "+5V" pin, it will damage the motherboard after booting up the system. So we recommend you must not install any connector on the +5V pin of the Front Panel Audio header. It will not affect the Audio function if you remove the connector from the +5V pin.
For this reason, we will remove the +5V pin from the Front Panel Audio header of our products in the future.
There are three examples for your reference, please refer to the following pictures.
Întrebare (Q&A-40|164):
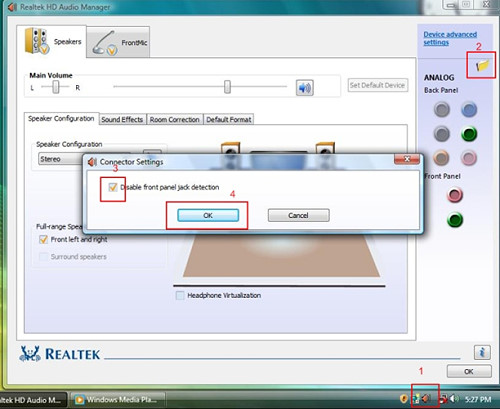
If I use AC'97 front audio panel with, how do I connect to the High Definition Audio header on the motherboard and get front audio work?(2006/2/17)
Răspuns:If you use AC'97 audio panel, please install it to the front panel audio header as below:
A. Connect Mic_IN (MIC) to MIC2_L.
B. Connect Audio_R (RIN) to OUT2_R and Audio_L (LIN) to OUT2_L.
C. Connect Ground (GND) to Ground (GND).
D. MIC_RET and OUT_RET are for HD audio panel only. You don't need to connect them for AC'97 audio panel.
E. Enter BIOS Setup Utility. Enter Advanced Settings, and then select Chipset Configuration. Set the Front Panel Control option from [Auto] to [Enabled]. For Windows® XP
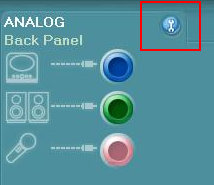
F. Enter Windows® system. Click the icon on the lower right hand taskbar to enter Realtek HD Audio Manager. Click "Audio I/O", select "Connector Settings", choose "Disable front panel jack detection", and save the change by clicking "OK". For Windows® Vista™
F. Enter Windows® system, 1: Double click the icon on the lower right hand taskbar to enter Realtek HD Audio Manager. 2: Click the "Folder" icon at the top-right corner. 3. Check "Disable front panel jack detection". 4. Click "OK".
(Please refer to the following picture)
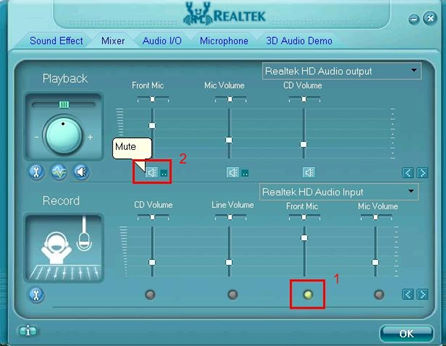
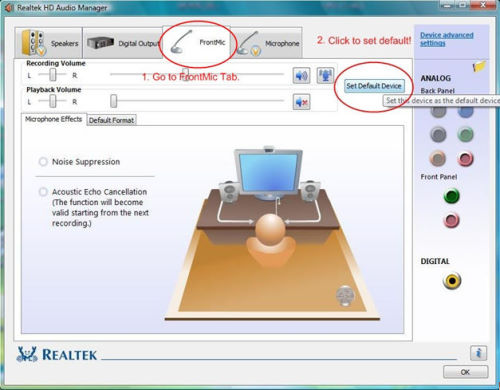
G. To activate the front mic: For Windows® XP:
Please select the Front Mic as default record device in No. 1.
If you want to hear your voice through Front Mic, please deselect "Mute" in No. 2 For Windows® Vista™:
1.Go to the "FrontMic" Tab in the Realtek Control panel.
Click "Set Default Device" to make the Front Mic as the default record device.
Întrebare (Q&A-40|166):
What's the requirement for High Definition Audio to work under Windows® XP 64bit?(2006/2/17)
Răspuns:For normal working of High Definition Audio under Windows® XP 64bit, there is a hotfix file provided by Microsoft. Please install the hotfix before installing the audio driver. Otherwise, the audio driver may not be installed successfully.
Please click the link to download the hotfix file:
http://support.microsoft.com/?kbid=901105
Întrebare (Q&A-7|34):
Can I use the microphone if I select 6 speakers in C-Media Audio Configuration?(2003/5/9)
Răspuns:If you select 6 speakers in C-Media Audio Configuration for 5.1 CH output, all three audio connectors (Line in, Line out and MIC) are defined as output connectors.
Microphone is an input device. So you are not able to use the microphone at this moment.
Întrebare (Q&A-7|33):
How do I select "Output Type" in C-Media 3D Audio Configuration?(2003/5/9)
Răspuns:Please select "Analog" for "Output Device" in C-Media 3D Audio Configuration.
Întrebare (Q&A-2|10):
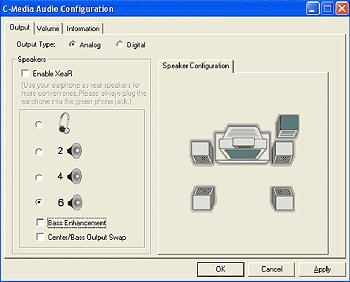
If I want to use 4/6 speakers, how do I setup 4/6-Channel audio ?(2002/11/26)
Răspuns:STEP 1: 4 CH: Connect the front L/R channel to "Line Out", the rear L/R channel to "Line In".
6 CH: Connect the front L/R channel to "Line Out", the rear L/R channel to "Line In", and the Center/Subwoofer channel to "Mic In".
STEP 2:
After installation of C-Media Audio driver, you will find an icon "C-Media Audio configuration" on the taskbar.
STEP 3:
Click the icon, and the screen will show the current audio configuration.
Select "Output" to change your audio configuration. Select "Analog" for Output Type and choose "4 channels" / "6 channels" for your speaker configuration.
 Meniul
 (2008/7/31)
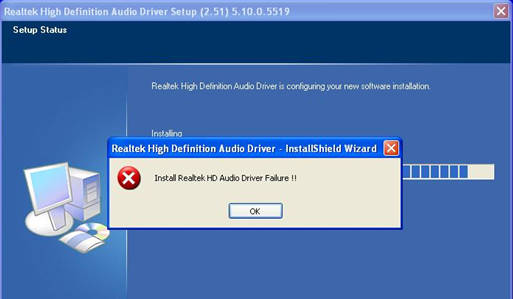 (2008/6/26)
 (2007/4/20)
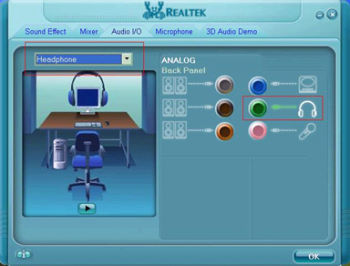
 (2007/1/16)