ASRock
 Menu Menu
We use cookies to offer you a more personalized and smoother experience.
By visiting this website, you agree to our use of cookies. If you prefer not to accept cookies or require more information, please visit our Privacy Policy.
Necessary cookies
These cookies are essential for the proper functioning of the website and cannot be turned off.
Analytics cookies
These cookies help us understand how visitors use our website.
Marketing cookies
These cookies are used to track visitors and display relevant advertisements.
Social media cookies
These cookies allow you to share pages and content on social media.
| Code | Description |
| FF, 00 - 19 D0 - D3 | Please check if the CPU is installed correctly and then clear the CMOS. |
| 31 - 3B 51 - 55 | Problem related to CPU and memory. Please clear the CMOS. Re-install the CPU and memory. |
| D4 - D5 | PCI resource allocation error. Out of Resources. |
| D6 92 - 97 | The graphics card or iGPU could not be recognized. Please clear CMOS and try re-installing the graphics card. If the problem still exists, please try installing the graphics card in other slots or try other graphics cards. |
| D7 | The keyboard and mouse could not be recognized. Please try re-installing the keyboard and mouse. |
| D8 | Invalid password |
| 9A - 9D | Problem related to USB devices. Please try removing all USB devices. |
| E8 - EB | S3 Resume failed (S3=Sleep) |
| 03 | System is entering S3 state (S3=Sleep) |
| 04 | System is entering S4 state (S4=Hibernate) |
| 05 | System is entering S5 state (S5=Soft power off) |
| 30 | System is waking up from S3 state (S3=Sleep) |
| 40 | System is waking up from S4 state (S4=Hibernate) |
| AA | System is entering OS |

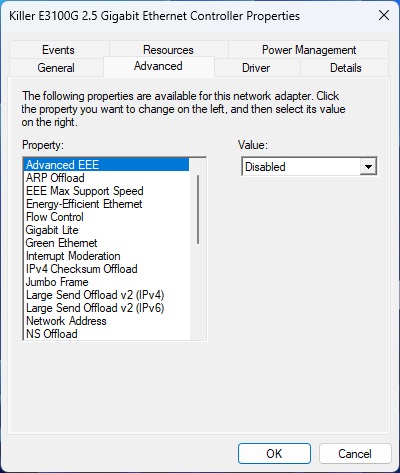
![Select Clear Secure Boot Keys, then choose [Yes].](/support/faq/190-2.jpg)

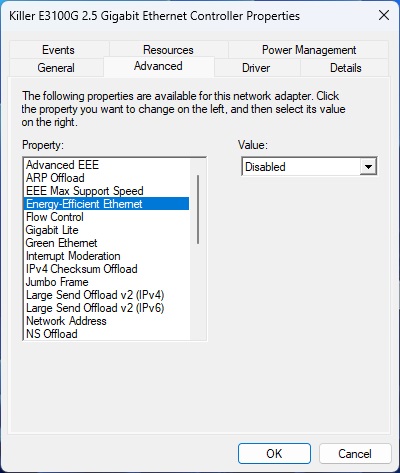
![After clearing the keys, select Install Default Secure Boot Keys, then choose [Yes].](/support/faq/190-4.jpg)


AMD RZ717 (Mediatek) | PCI\VEN_14C3&DEV_0717 |
PCI\VEN_14C3&DEV_0738 | |
PCI\VEN_14C3&DEV_6639 | |
PCI\VEN_14C3&DEV_7925 | |
PCI\VEN_14C3&DEV_7927 | |
AMD RZ616 (Mediatek) | PCI\VEN_14C3&DEV_0608 |
PCI\VEN_14C3&DEV_0616 | |
PCI\VEN_14C3&DEV_7902 | |
PCI\VEN_14C3&DEV_7920 | |
PCI\VEN_14C3&DEV_7922 | |
PCI\VEN_14C3&DEV_7961 | |
Azurewave AW-CB515 | PCI\VEN_10EC&DEV_B822 |
PCI\VEN_10EC&DEV_C822 | |
PCI\VEN_10EC&DEV_C82F | |
PCI\VEN_10EC&DEV_B821 | |
PCI\VEN_10EC&DEV_C821 | |
PCI\VEN_10EC&DEV_C82B | |
PCI\VEN_10EC&DEV_D723 | |
Azurewave AW-XB611 | PCI\VEN_10EC&DEV_885D |
PCI\VEN_10EC&DEV_A85D | |
PCI\VEN_10EC&DEV_B520 | |
PCI\VEN_10EC&DEV_B851 | |
Azurewave AW-EB601 | PCI\VEN_10EC&DEV_8922 |
PCI\VEN_10EC&DEV_A922 | |
Azurewave AW-XB560 | PCI\VEN_10EC&DEV_C852&SUBSYS_C85210EC |
PCI\VEN_10EC&DEV_C852&SUBSYS_585217AA | |
PCI\VEN_10EC&DEV_C852&SUBSYS_88E5103C | |
PCI\VEN_10EC&DEV_C852&SUBSYS_C88510EC | |
PCI\VEN_10EC&DEV_C852&SUBSYS_C88610EC | |
PCI\VEN_10EC&DEV_C852&SUBSYS_C88710EC | |
PCI\VEN_10EC&DEV_C852&SUBSYS_C81211AD | |
PCI\VEN_10EC&DEV_C852&SUBSYS_56011A3B | |
PCI\VEN_10EC&DEV_C852&SUBSYS_56021A3B | |
PCI\VEN_10EC&DEV_C852&SUBSYS_E110105B | |
PCI\VEN_10EC&DEV_C852&SUBSYS_56031A3B | |
PCI\VEN_10EC&DEV_C852&SUBSYS_C80110EC | |
PCI\VEN_10EC&DEV_C852&SUBSYS_C80210EC | |
PCI\VEN_10EC&DEV_C852&SUBSYS_00B51E26 | |
PCI\VEN_10EC&DEV_C852&SUBSYS_C80310EC | |
PCI\VEN_10EC&DEV_C852&SUBSYS_C3261D31 | |
PCI\VEN_10EC&DEV_C852&SUBSYS_56001A3B | |
PCI\VEN_10EC&DEV_C852&SUBSYS_54001A3B |
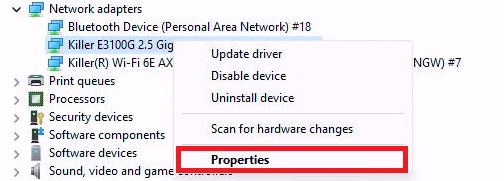
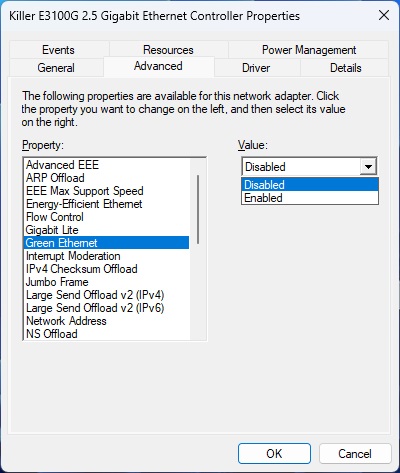
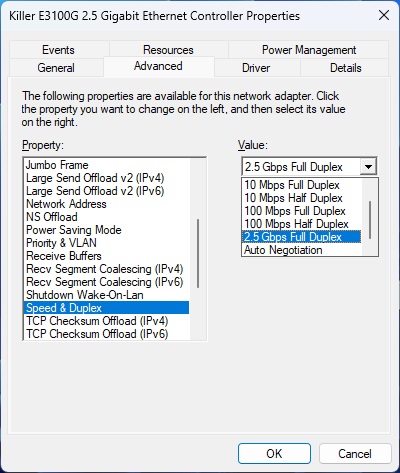
![Set Large Send Offload v2 (IPv4) to [Disabled]](/support/faq/174-13.jpg)
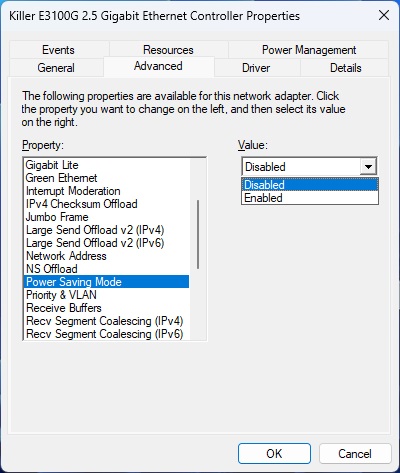
![Set Large Send Offload v2 (IPv6) to [Disabled]](/support/faq/174-14.jpg)
| Intel Chipset | Supported CNVi System Interface Type |
| Intel 300 series | M.2: CNVio |
| Intel 400 series | M.2: CNVio and CNVio2* *CNVio2 support only for Model Intel AX101, AX201, AX203. |
| Intel 500 series | |
| Intel 600 series | M.2: CNVio and CNVio2 |
| Intel 700 series | M.2: CNVio and CNVio2 |